
.
The UnifiedSessionsManager is currently first of all a command line application, but designed for the application of complex multi-vendor and multi-screen environments of physical and virtual facilities. Thus it is a sessions management utility of modern workspaces, thus basically a graphics-control application.
The lifecycle of the UnifiedSessionsManager is going to evolve to the migration towards the extension for a graphical user interface in current versions. The first step for providing an additional graphical interface is the integration of the generated cache database into the Gnome based starter application. The first application here is a simple list based starter application for intermixed hypervisors, physical machines, and additionally the combination with the functionality for native logins into OSs by provided HOSTs plugins.
Initially two basic interfaces are provided from now own. The CREATE list element for the start of virtual machines, and physical machines either by Wake-On-LAN or (next) by IPMI. Second the LOGIN list element for native logins - either into Host-OSs running on the physical machines, or GuestOSs running within virtual machines.
Both applications are implemented quite simple in order to demostrate
The following steps show the blueprint for the realworld application - these are actually almost the complete resulting
application steps.
These are described within the following chapters with additional application examples.
The following menu is provided as a basic menu and starting point as customisation pattern for automated installation by a script.
| Gnome menu template |
|---|
The next figure depicts the display of the database entries by the list 'ctys-CREATE-ALL', which contains all the
complete unfiltered set of database record.
The entry number '477' is selected for start, the resulting execution call is offered by the dialog box 'ctys-Selection'
either for modification, or for execution by confirmation.

| Gnome starter - CREATE |
|---|
The internal data of the operational data storage, is integrated here by just a few lines of scripting with zenity into the Gnome based desktop, providing a graphical starter application. The scope of managed entities within the displayed list comprises here all supported VMs and PMs, including native logins by CLI, X11-Terminals, VNC, and RDP. Due to stored defaults, in addition to hypervisor consoles also the preconfigured native login applications could be started automatically.
This demonstrates the combination and setup of
ctys-vdbgen(1)
for automatic creation of the cacheDB and
the
gnome-starter(1)
application for graphical presentation of the data within some minutes.
The presented test environment on a medium-range machine for example contains about 350VMs used
by NFS on several machines resulting in about 1400entries for VMs and PMs by multipath-access.
The whole automated initial creation of the cacheDB takes some Minutes for scanning filesystems
and presents than the shown graphical interface with a startup in the range of seconds for each
selected VM.

| Database creation and application |
|---|
The database contains the hypervisors KVM, QEMU, VBOX, VMW, and XEN, additionally PMs.
For each entry also default login desktops or commandline applications are stored for automation of
console interconnection as well as native logins - based on CLI, X11, VNC, and RDP.
Additionally a first minor version of customisable menus for Gnome based desktops is integrated.
These offer either for private menus, or shared common menus with a pattern for simple customisation.
The next important aspect when working with huge amounts of machines and consoles - either physical, or virtual,
or just ordinary remote desktops - is the usability of the workspace on the desktop.
This frequently requires the application of multiple displays.

| Gnome Xinerama |
|---|
The Xinerama mode is provided by a specific extension for logical addressing of the standard X11 functionality.
The previous examples are just performed by a mouse-click - within seconds - no longer by painful manual execution or enduring custom-scripts development.
The current version supports the manual integration of ctys into menu entries of any X11 based desktop. This document describes the manual setup of ctys based menu entries for Gnome desktops.
The additional standard Gnome utility required for GUI based start of VMs is zenity,
which offers an easy-to-use minimalistic graphical interface particularly for list-elements.
This simply could be called from a shell script and returns the selected data.
Another zenity widget e.g. provides a text-box for modification and confirmation of
the current call.
The following menu is provided as a pattern to be installed either as a private, or as a shared menu.
The configuration files and install scripts are installed within the directory $HOME/.ctys/xdg.d.
| Gnome menu template |
|---|
The private installation is performed by ctys-xdg --menu-create , whereas the shared installation is performed by the script ctys-xdg --menu-create --menu-shared The shared installation is stored within the common system directories and therefore requires root permissions. For the private installation the user permissions are sufficient.
The private base directories used are the standard directories as defined by the Desktop Menu Specification-1.0
from freedesktop.org. These are $HOME/.config,
$HOME/.icons, $HOME/.local/share/applications, and
$HOME/.local/share/desktop-directories.
The following description offers a simple and fast setup of the predefined menus by just one script-call.
But the whole process could be performed manually by the property menus too as described within
the specific chapters.
Gnome offers facilities for the creation of custom menus, which could be either setup individually
within a private environment, or as a shared menus for all users on a specific machine.
The resulting functional possibilities are basically similiar, thus the intention of usage and flexibility is
the major aspect for the design choice.
Whereas the resulting functionality is quite similiar, the physical storage of the configuration infomation is obviously
different.
The common shared menu entries for the machine are stored within the system directories, with write operations requiering
root permissions.
The private environments are stored commonly within individual subdirectories of the specific user, thus frequently are
visible just for the owner.
The configuration decision here is to use the custom files for static setups as defined by Gnome, even though some
configuration with toolsets for runtime dynamic configuration might be applicable.
Nevertheless, due to the contibous automatic synchronisation of the Gnome desktop with it's configuration
files, some - almost unlimited - runtime dynamic is available inherently by default.
The applied directory structures are designed and named in order to minimize the deviation between the shared and private variant.
The menu structure of Gnome is defined by a basically tree based data structure, which is defined by XML syntax
within a nested file structure.
The configuration syntax is a powerful set of language elements particularly offering for file and directory based
inclusion configuration data extension.
This is extended by means of decisive syntax elements for suppression, additional, exclusive, and non-exclusive
extension of present menu configuration data.
The UnifiedSessionsManager menus are hooked-in into the configuration file:
$HOME/.config/menus/gnome-applications.menu
This is done by the entry
<MergeFile>applications-merged/ctys-UnifiedSessionsManager.menu</MergeFile>
The entry is located within the file for example as depicted in the following figure, where the file itself is contained within a subdirectoy 'applications-merged' and addressed by a relative path:
  <!DOCTYPE Menu
    PUBLIC '-//freedesktop//DTD Menu 1.0//EN'
    'http://standards.freedesktop.org/menu-spec/menu-1.0.dtd'>
  <Menu>
    <Name>Applications</Name>
    <MergeFile type="parent">/etc/xdg/menus/gnome-applications.menu</MergeFile>

  <!-- *** HOOK-START *** -->

    <MergeFile>applications-merged/ctys-UnifiedSessionsManager.menu</MergeFile>

  <!-- *** HOOK-END *** -->

          <Menu>
                  <Name>alacarte-made</Name>
                  <Directory>alacarte-made.directory</Directory>
                  <Include>
                         <Filename>alacarte-made.desktop</Filename>
                  </Include>

                  ...
                  ...
                  ...
The file is actually located within the pathname:
$HOME/.config/menus/applications-merged/ctys-UnifiedSessionsManager.menu
The menu definition is hereby assembled by the following file types in accordance to the standard Gnome and Common Desktop definitions:
The hooked-in file contains the current version the whole structure definition of the ctys-menu-hierarchy as single standalone structure-definition file. The menu UnifiedSessionsManager is here included as a sub-menu of the Applications menu.
  <!DOCTYPE Menu PUBLIC "-//freedesktop//DTD Menu 1.0//EN"
  	  "http://www.freedesktop.org/standards/menu-spec/menu-1.0.dtd">
  <!-- Do not edit manually - generated and managed by xdg-desktop-menu -->
  <Menu>
    <Name>Applications</Name>

    <AppDir>/homen/acue/.gnome/ctys/applications/</AppDir>
    <DirectoryDir>/homen/acue/.gnome/ctys/desktop-directories/</DirectoryDir>


    <Menu>
      <Name>UnifiedSessionsManager</Name>
      <Directory>ctys-UnifiedSessionsManager.directory</Directory>
      <Include>
        <Filename>ctys-help.desktop</Filename>
        <Filename>ctys-CREATE-CONSOLE.desktop</Filename>
        <Filename>ctys-LOGIN-CONSOLE.desktop</Filename>
      </Include>


      <Layout>
        <Merge type="all"/>
        <Filename>ctys-help.desktop</Filename>
        <Menuname>ctys-admin</Menuname>
        <Merge type="menus"/>
        <Merge type="files"/>
        <Separator/>
        <Filename>ctys-CREATE-CONSOLE.desktop</Filename>
        <Filename>ctys-LOGIN-CONSOLE.desktop</Filename>
        <Separator/>
        <Menuname>Sysadmin</Menuname>
        <Separator/>
        <Menuname>Desktops</Menuname>
      </Layout>


       <Menu>
         <Name>Sysadmin</Name>
         <Directory>ctys-Administrator.directory</Directory>

         <Menu>
  	 <Name>hosts</Name>
  	 <Directory>ctys-hosts.directory</Directory>
  	 <Include>
             <Filename>ctys-localhost.desktop</Filename>
  	 </Include>
         </Menu>

         <Directory>ctys-Administrator.directory</Directory>
         <Include>
           <Filename>ctys-root-term-localhost.desktop</Filename>
         </Include>
       </Menu>

       <Menu>
         <Name>Desktops</Name>
         <Directory>ctys-Desktops.directory</Directory>

         <Menu>
  	 <Name>hosts</Name>
  	 <Directory>ctys-hosts.directory</Directory>
  	 <Include>
             <Filename>ctys-localhost.desktop</Filename>
  	 </Include>
         </Menu>

         <Directory>ctys-Desktops.directory</Directory>
         <Include>
           <Filename>ctys-localhost.desktop</Filename>
         </Include>
       </Menu>


      <Menu>
        <Name>ctys-admin</Name>
        <Directory>ctys-admin.directory</Directory>
        <Include>
          <Filename>ctys-CONFIG.desktop</Filename>
          <Filename>ctys-GROUPS.desktop</Filename>
          <Filename>ctys-MACROS.desktop</Filename>
          <Filename>ctys-SCRIPTS.desktop</Filename>
        </Include>
      </Menu>

    </Menu>
  </Menu>
.
The following entry depicts as an example representation the data for the entry node of the configuration submenu for the UnifiedSessionsManager itself.
  [Desktop Entry]
  Name=ctys configuration
  Name[de]=ctys Konfiguration
  Name[en_GB]=ctys configuration
  Comment=Configuration Files
  Comment[de_DE]=Konfigurations Dateien
  Comment[en_GB]=Configuration Files
  Type=Directory
  Icon=applications-utilities
  Encoding=UTF-8
The following entry depicts as an example representation the data for the entry node of the configuration for the gnome-starter(1) with CREATE. submenu for the UnifiedSessionsManager itself.
  [Desktop Entry]
  Type=Application
  Version=1.0
  Encoding=UTF-8
  Name=ctys Create Console
  Comment=ctys Create Console
  Name[en_CA]=ctys Create Console
  Name[en_GB]=ctys Create Console
  Name[de_DE]=ctys Start-Konsole
  Comment[de]=ctys Start-Konsole
  #Possible absolute PATH:
  #  Exec=/homen/acue/utils/gnome-starter CREATE CONSOLE ALL
  Exec=gnome-starter CREATE CONSOLE ALL
  #Possible absolute PATH:
  #  Icon=/opt/i4p/patches/icons/misc-collection/ctys-exe.svg
  #Possible absolute PATH:
  #  ~/.icons
  Icon=ctys-exe
  Terminal=true
  Categories=System;
The pixmaps could be stored within several directories in multiple formats and resolution. The current choice for the UnifiedSessionsManager is svg and stored in a pixmaps directory coallocated with the directories applications and desktop-directories in accordance to the standard sub-structure of /usr/shared directory tree. This simplifies the common installation procedure for private and shared installs.
The share instalation is basically the same, the deviation is basically just within the root nodes for installation. The applications, desktop-directories, and pixmaps directories are allocated within the /usr/shared directory tree.
The applications-merged files are just copied into the /etc/xdg/menus/applications-merged subdirectory. Due to present inclusion of all files within this directory no file-patch is required in this case.
The first step is to open the dialog box for the menu entries by mouse context menu by right-mouse-click.

| Manual Gnome menu creation - Open context |
|---|
The dialogue box enables the creation and setting of submenus and entries.

| Manual Gnome menu creation - Dialogue |
|---|
A script is a shell executable, which could contain ctys calls intermixed with
native shell calls.
Thus this is particularly suitable for desktops containing various local applications.
The setup of a script is quite easy due to simple syntax as well as by tool support
with configurable standard editors.
The following example shows the 'manuals01.sh' entry for the creation of
the complete desktop for editing the manuals of ctys.

| Script Entries |
|---|
The setup is given as:
manuals01.sh
Where the content is:
  #!/bin/bash


  #
  #Prepare environment
  #
   . $(dirname ${0})/common.sh


  #
  #Start environment
  #
  if [ "$1" != "SETENV" ];then
      gnome-terminal --geometry=$(getGeometry  -g  180x20+0+0:A10) \
          --working-directory="$DOC_BLD_ROOT" \
          --title="DOC_BLD_ROOT" -x $0 SETENV&

      gnome-terminal --geometry=$(getGeometry  -g  180x10+0+350:A10) \
          --working-directory="$DOC_BLD_ROOT" \
          --title="DOC_BLD-01" -x $0 SETENV&

      gnome-terminal --geometry=$(getGeometry  -g  180x10+0+550:A10) \
          --working-directory="$DOC_BLD_ROOT" \
          --title="DOC_BLD-02" -x $0 SETENV&

      gnome-terminal --geometry=$(getGeometry  -g  180x10+0+750:A10) \
          --working-directory="$DOC_BLD_ROOT" \
          --title="DOC_BLD-03" -x $0 SETENV&

      nautilus --geometry=$(getGeometry  -g  1280x700+0+0:A20) $DOC_ALL&

      konq\u\eror --geometry=$(getGeometry  -g  1280x1048+0+0:A31) \
         $DOC_ALL_EN $DOC_ALL_DE&

      konq\u\eror --geometry=$(getGeometry  -g  1280x1048+0+0:A30) \
         $DOC_LIST_EN&

      konq\u\eror --geometry=$(getGeometry  -g  1280x1048+0+0:A00) \
         $DOC_BLD_ROOT $DOC_BLD_EN $DOC_BLD_DE &

      cd $BLD_ROOT && ctys desktops/dev/ctys/manuals01
  else
      #
      #Set environment
      #
      if [ -z "$CTYS_ENVSET" ];then
          export CTYS_ENVSET=1
  	exec bash -i
      fi
  fi
  exit 0
The result is depicted in the following figure.

| Script Entries - Resulting Desktop |
|---|
GROUPS are sets of hosts and virtual machines for ctys only.
This are particularly suitable for desktops build up by remote applications only,
including remote desktops and consoles.
The setup of groups allows for various specific parameters for each connection and
executed desktop.
In addition an overall task control is setup for a GROUP, which also could be setup by
reusable modular includes for various purposes.
The setup of a GROUP called by 'ctys' could be created in the same manner as script entries.
The following example shows the 'ctys admin/admin0' group entry for the creation of
the complete desktop for administration of some servers.

| GROUP Entries - menu Entries |
|---|
The menu entry could be setup as following, in this example:
/homen/acue/bin/ctys admin/admin0
With the content of the GROUP:
  #  -*- mode: conf; -*-
  #
  #This groups contains all machines in the management group of the
  #server group.
  #

  #
  #fileserver - CentOS-5.4 - VMware-Server
  root@delphi'( -t vnc -a create=l:DELPHI,reuse -g 1268x994:A00:ALL  -b 1,2)'

  #
  #backup-server - CentOS-5.4
  root@olymp'(  -t vnc -a create=reuse,l:OLYMP  -g 1268x964:A10:ALL  -b 1,2)'

  #
  #database-server - CentOS-5.4 - KVM
  root@app1'(   -t vnc -a create=reuse,l:APP1   -g 1268x994:A01:ALL  -b 1,2)'

  #
  #CUDA-server - CentOS-5.4 - KVM
  root@app2'(   -t vnc -a create=reuse,l:APP2   -g 1268x994:A21:ALL  -b 1,2)'

| GROUP Entries |
|---|
The result is depicted in the following figure.

| Script Entries - Resulting Desktop |
|---|
The online help menu could be basically created with any tool from the package. The usage is:
ctys -H html=base
or
ctys -H html=doc
This opens a browser with the provided help file 'doc.html'. The preconfigured browser is konqueror by default for now, when not available firefox is used. Any browser could be customized by the user.
The script could be integrated into Gnome by just configuring a menu item and using the call
for openning a (now still) draft online help by html and pdf files.
Additionally the commandline interface man pages are available.

| ctys-help-on - Online Help |
|---|
The GROUPS objects are represented by files containing multiple host entries. These could be edited by a preconfigured editor with the following call, which could be used within menu entries.
ctys-groups -e
The started editor or filebrowser opens by default all configured directories within the
CTYS_GROUPS_PATH.
The preconfigured default is the Emacs editor, if not present vi, vim, konqueror, or nautilus are
called.
The user can customize any browser or filemanager as required.

| GROUPs - Emacs editor |
|---|
This could be varied call-by-call e.g. by
CTYS_GROUPSEDIT=konqueror ctys-groups -e

| GROUPs - konqueror browser with tabs |
|---|
The MACROS are represented by files containing the set of definitions to be applied. These could be edited by a preconfigured editor with the following call, which could be used within menu entries.
ctys-macros -e
The started editor or filebrowser opens by default all configured directories within the
CTYS_MACROS_PATH.
The preconfigured default is the Emacs editor, if not present vi, vim, konqueror, or nautilus are
called.
The user can customize any browser or filemanager as required.

| MACROS - Emacs editor |
|---|
The SCRIPTS are contained in within the defined search path CTYS_SCRIPTS_PATH similar to the systems PATH variable. These could be edited by a preconfigured editor with the following call, which could be used within menu entries.
ctys-scripts -e
The started editor or filebrowser opens by default all configured directories within the
CTYS_SCRIPTS_PATH.
The preconfigured default is the Emacs editor, if not present vi, vim, konqueror, or nautilus are
called.
The user can customize any browser or filemanager as required.

| SCRIPTS - Emacs editor |
|---|
This could be varied call-by-call e.g. by
CTYS_SCRIPTEDIT=konqueror ctys-scripts -e

| SCRIPTS - konqueror browser with tabs |
|---|
The configuration files could be browsed by konqueror with the following call:
ctys-config -e
The started editor or filebrowser opens by default all configured directories within the
standard paths.
The preconfigured default is the Emacs editor, if not present vi, vim, konqueror, or nautilus are
called.
The user can customize any browser or filemanager as required.

| CONFIGURATION - konqueror browser |
|---|
The following example shows the configuration of a graphical starter based on zenity.
This is based on some pre-requirements in order to work. The main requirement is the presence of a cacheDB, which could be generated by the utility ctys-vdbgen(1) , for further information refer to the man pages of the tool. The second requirement is the static definition of the call parameters of the start call, which relies on the defaults of each plugin. These could be modified by the related configuration files, but may suffice the basic initial creation and reconnection(by REUSE) for each VM.
This works for all supported hypervisors due to the unique interface for all - providing basic features for each. Additional parameters such as the screen position and windows size are not provided for current version.
It is recomended to set the type of the menu entry to 'Start application in terminal'
because some user interaction may be required.
For example in case of SSH first time connection the new key has to be confirmed.
The temporary utility gnome-starter accepts the parameters PM, VM, and LIST. The parameter PM sets the start of a PM login by usage of VNC, this also restricts the displayed choice-list to PMs only and additionally assures that the displayed records are unique each. The parameter VM works similiar for VMs, where only VMs, but of all supported types are displayed. Due to the generic standard-interface and apropriate defaults delivered, each could be started in the same manner.
The standard call syntax fo selection of subsets from the database is
gnome-starter <ACTION> <TARGET-TYPE> <SCOPE>
ACTION could be CREATE, LOGIN, or LIST. TARGET-TYPE is CONSOLE. SCOPE could be ALL, VM, or PM.
The current version does support for native access UNIX systems only. Thus even though guest systems could contain any OS supported by the hypervisor are successfully collected into the database, the selection in the starter for LOGIN actions may fail for non-supported systems. Specific parameters e.g. for individual screen positions are not provided by this version.
The PM starter could be configured in the same manner as any menu item. The required call is
gnome-starter CREATE CONSOLE PM
The generated standard call is:
  ctys -t <type> \
       -a create=dbrec:<database-index>,reuse,CONSOLE:<current-default> \
       -Y  -c local <username>@<hostname>
This opens now 2 windows, the zenity list window and in addition a terminal window.
ATTENTION:
The terminal window is required in cases, where user interaction is requiered.
In some cases the system may even hang in an non-reachable console dialog, when
a terminal is missing.

| Gnome starter menu |
|---|

| Gnome starter |
|---|
After a specific entry is selected a second window is opened for call confirmation.
This text-box allows for modification of the generated call if required.
The confirmation of this second window starts the entry.

| Call confirmation |
|---|
The requested user interaction is here to confirm new host entry for OpenSSH.

| Gnome starter - SSH-Confirmation |
|---|
The result is depicted in the following figure.

| Gnome starter - Resulting Desktop |
|---|
The VM starter could be configured in the same manner as any menu item. The required call is
gnome-starter CREATE CONSOLE VM
The starter for LOGIN is similar but slightly different.
This is due to required additional information related to the guest OS, such as the
ip address of the contained guest system.
Also the preconfigured default HOSTs CONSOLE is displayed and used instead of the
CONSOLE to be attached to the hypervisor.
In addition some helpful information related to the contained guest OS distribution
are presented.

| Gnome starter - LOGIN list |
|---|
The resulting call is a complete call due to the much simpler structure for a simple login, than
in case of CREATE, where additional data may be fetched form the database.

| Gnome starter - Gnome starter - LOGIN confirmation |
|---|
In case of difficulties call the interface manually from the command line. The main prerequirement is an existing cacheDB (refer to ctys-vdbgen(1) ), which may not contain redundant entries. This could be verified by ctys-vhost(1) with the -M option.
When a call does not start from the menu entry the required PATH may not be complete. Thus one solution is to enter absolute pathnames for the executable, for example:
/home/yourHome/bin/ctys ...
The most important practical usability aspect when working with huge amounts of machines and consoles - either physical, or virtual,
or just ordinary remote desktops - is the usability of the workspace on the desktop.
The key for the usability is here the application of multiple display environments, where these could be either combined locally,
or virtually from local and remote sites.
| Gnome Xinerama |
|---|
These local and remote pyhsical screens could be combined to a virtual screen by e.g. Xinerama (or distributed e.g. by Xrdb)
what is supported by the UnifiedSessionsManager particularly through the extension of the
geometry
option of X11.
This extension provided - beneath others - for an overlay of a virtual grid of screens on top of the combined displays,
thus the physical screens could be addressed by user-defined labels, the required pixel-calculations are encapsulated by
the mapping-functions of the UnifiedSessionsManager.
The following screenshot represents the logical view of the combined displays.

| Gnome Xinerama |
|---|
Another benefit from handling of logical addresses only is the independent addressing from physical changes,
which occurs frequently when the hardware is exchanged.
This is due to the automatic enumeration of components by the system, which varies widely by seemingly minor changes.
The mapping and address calculations are described in depth within the User-Manual of the
DOC-Package(Remember the CCL-3.0 Licensing).
Physical screens are by default supported for the X11 based desktops as independent terminal
sessions. This particularly excludes the mouse movement between the screens by default.
One appropriate facility for the combination of pyhsical screens into on superpositined-screen as a combination
is the so called Xinerama mode.
This simply adds the pixel-arrays together and produces a resulting array of size by the overall sum of pixels.
Therefore the new address range changes to the new screen size.
In practical cases the order of the screens - meaning the actual physical position of a specific pixel-area - may change e.g. due
to initialization or hardware-exchange.
Particularly the hardware exchange, even the exchange of the slot position of a specific graphics card, may
change the whole setup dramitically.
Therefore the persistent storage of desktop scripts with geometry-positions should address logically without physical dependency.
The applied scheme for logical addressing is - as the main philosophy - kept as simple as possible, therefore just relies on the standard means of the X11 configuration files. The specific approach is to utilize the X11 feature of user specific section/screen address labels for multiple display. These could be simply registered by editing the file
/etc/X11/xorg.conf
The custom labels are from then on valid screen aliasses for the specific array of pixels of the defined screen.
Particularly in case of hardware changes the only thing to change is the label within the xorg.conf file, the bunch of
user specific desktop configurations could remain unchanged.
An extract from an example file is given in the following figure.
The Section ServerLayout is the logical overall screen, whereas the Screen sub-sections represent specific
pixel-arrays mapped to a physical position.
Thus by exchange of physical pixel arrays a re-positioning of physical devices could be adapated to previous definitions,
and the legacy desktop configurations could be kept unchanged.
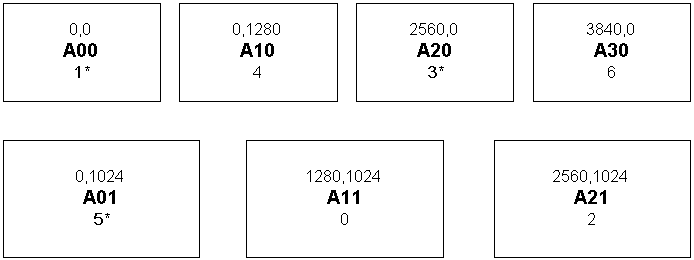
In this particular case the screen names are defined in accordance to the 2-dimension array-like matrice-layout
of the virtual screen.
This eases the sddressing e.g. by '100x100+766+531:A21', which meand the positions are relative to the screen A21.
instead of calculating '100x100+2146+1811', which may change completely for HW changes, without physical changes
of the screen-position.
This result from a logically double-level-remapping of pixels.
For further details refer to the User-Manual(Remember the CCL-3.0 License with the full scope of commercial restrictions).
  # nvidia-xconfig:
  #    X configuration file generated by nvidia-xconfig
  # nvidia-xconfig:
  #    version 1.0  (buildmeister@builder58)  Tue Oct 20 21:25:04 PDT 2009

  Section "ServerLayout"
      Identifier     "ALL"
      Screen      0  "A11" 1280 1024
      Screen      1  "A21" 2560 1024
      Screen      2  "A30" 3840 0
      Screen      3  "A01" 0 1024
      Screen      4  "A00" 0 0
      Screen      5  "A31" 3840 1024
      Screen      6  "A10" 1280 0
      Screen      7  "A20" 2560 0
      InputDevice    "Keyboard0" "CoreKeyboard"
      InputDevice    "Mouse0" "CorePointer"
      Option         "Xinerama" "1"
  EndSection


  Section "Files"
      FontPath        "unix/:7100"
  EndSection

  Section "Module"
      Load           "dbe"
      Load           "extmod"
      Load           "type1"
      Load           "freetype"
      Load           "glx"
  EndSection

  Section "ServerFlags"

  # Removed Option "Xinerama" "1"
  # Removed Option "Xinerama" "0"
      Option         "Xinerama" "1"
  EndSection

  Section "InputDevice"

      # generated from default
The following (independent) example depicts the resulting mapping required for actually unchanged virtual display positions
in case of pyhsical re-ordering of pixels.
| Physical Xinerama-Mapping |
|---|
The following examples show some additional examplary cases of convenience integration into gnome by simple menus.
The following desktop demonstrates the automated setup of a complex runtime environment. There are just some positioning restrictions due to limits of some propriatery client applications.
The required menu entry for starting is:
/home/userName/bin/ctys demo/vm-desktop-01
| Gnome starter - Demo Desktop |
|---|
The following extract from the GROUPs file shows the configuration parts for XEN and VBOX.
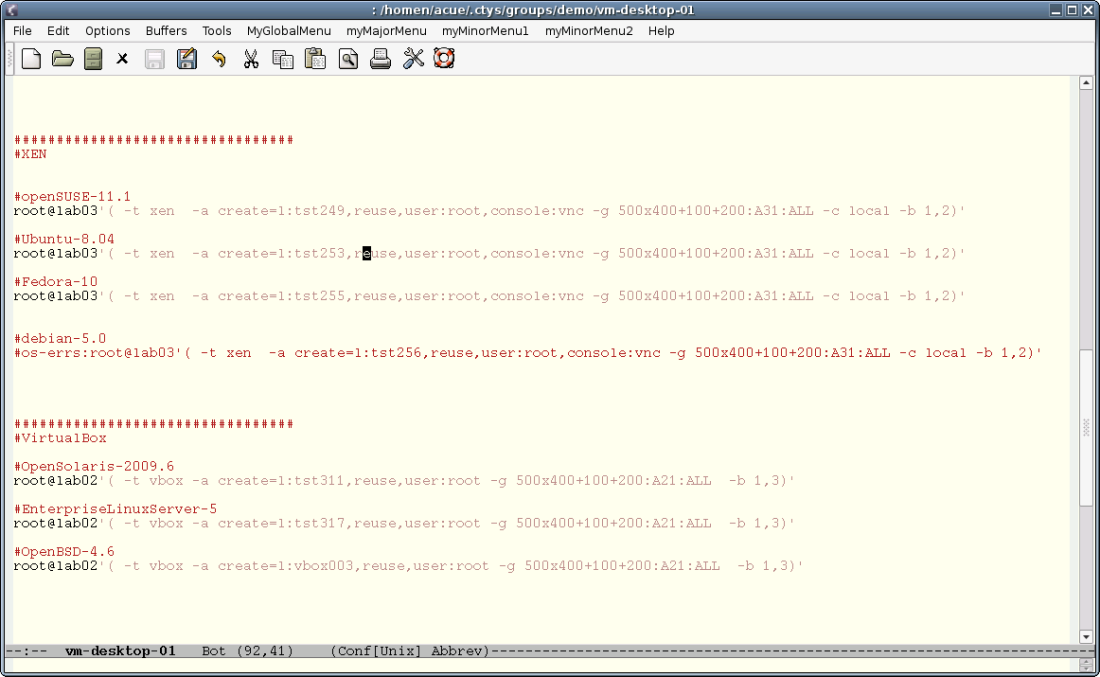
| Gnome starter - Extract from GROUP |
|---|
The
ctys-groups(1)
command could be used to resolv the entries within the GROUP for cut-and-paste
operations.

| Gnome starter - Display of resolved GROUP |
|---|
This example shows an entry for a single VM. The actual menu entry is written within one line:
  /homen/acue/bin/ctys
     delphi'(
      -t vmw
      -a create=reuse,l:office001,b:/mntn/vmpool/vmpool03/vmw/office,user:acue
      -g 1268x994:A11:ALL
      -b 1
      -c local
     )'

| Gnome starter single entry - Menu |
|---|
This menu entry starts a VM for example here on a VMware Server-2(TM).
It has to be recognised that the whole command line is visible in clear text by 'ps'
command on the local machine, and at least partially on the target machine.
The intermediate connection is encrypted by OpenSSH.
Additonally menu entries are stored within files, which must not contain any serious passwords at all.
Thus for security reasons in this case the username is provided only,
the password is entered interactively.
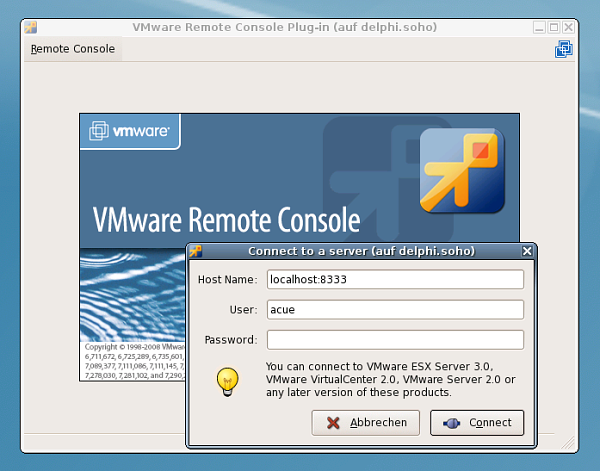
| Gnome starter - Gnome starter LOGIN - VMWRC Login |
|---|
The started Windows2000(TM) desktop in this case could be seen as 'second level menu entry'
for virtual applications.

| Gnome starter LOGIN - Started W2K desktop |
|---|
This example shows an entry for a the maintenance of two PABXs, where one is an Asterisk
PABX on a distinct VoIP VLAN.

| Gnome starter PABX - Interconnection Structure |
|---|
The interconnection is setup by an intermediate gateway, which is passed by the utility 'ctys-beamer'.
  ctys-beamer -Y --x11 -R root@tserv00 -b async --beam-this \
    ctys -Y -a create=l:PABX2,reuse root@192.168.50.1
The resulting starter script is

| Gnome starter PABX - Script |
|---|
The actual menu entry is:
pabx.sh
which could be started as:

| Gnome starter PABX - menu |
|---|
This opens the two views, on the left the VM containing the legacy configuration and monitoring
utily from the '90s' running on the local segment interconnected by an RS232 on one gateway.
The right view shows the Asterisk master PABX which is running on the VoIP gateway within
another VLAN, thus has to be interconnected by a TCP/IP gateway.

| Gnome starter PABX - Script |
|---|
REMARK: Due to some limits by OpenSSH for handling of specific interfaces on the targeted TCP/IP gateway, evantually some static routing for specific hosts on different VLANs is required.
ctys(1) , ctys-config(1) , ctys-groups(1) , ctys-macros(1) , ctys-scripts(1) , gnome-starter(1) , ctys-xdg(1) , ctys-vdbgen(1) , ctys-vhost(1) , zenity(1)
For standards:
Freedesktop: <http://www.freedesktop.org>
Xorg: <http://www.x.org>
For implementations:
FVWM: <http://www.fvwm.org>
Gnome: <http://www.gnome.org>
KDE: <http://www.kde.org>
XFCE: <http://www.xfce.org>
Written and maintained by Arno-Can Uestuensoez:
| Maintenance: | <<acue_sf1 (a) users sourceforge net>> |
| Homepage: | <https://arnocan.wordpress.com> |
| Sourceforge.net: | <http://sourceforge.net/projects/ctys> |
| Project moved from Berlios.de to OSDN.net: | <https://osdn.net/projects/ctys> |
| Commercial: | <https://arnocan.wordpress.com> |

Copyright (C) 2008, 2009, 2010, 2011 Ingenieurbuero Arno-Can Uestuensoez
For BASE package following licenses apply,
This document is part of the DOC package,

For additional information refer to enclosed Releasenotes and License files.